Loading…
Close ×
Inquiry
×

Inquiry

Inquiry

Get A Free Quote

Let’s get to work! Contact us with the form below at no obligation to you. Together, we’ll set the project’s scope and demonstrate you value that the experts at cmsMinds bring to projects like yours.

Tell Us A Bit About Yourself

    Select As Many Of These As Apply

    How To Use Deploy Module In D8

    Jul 2017 | by Jayesh

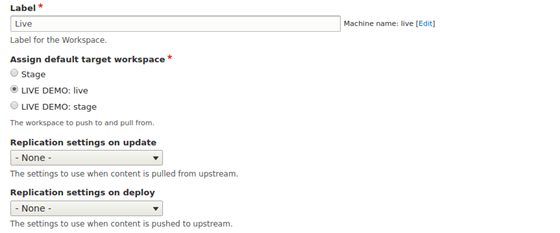
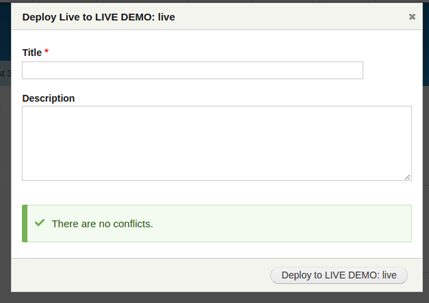
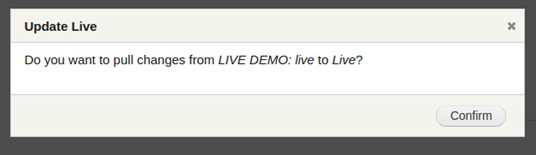
    For an enterprise projects, it’s almost mandatory to have multi versions: Development, Testing, Staging environments for Drupal project. You may face challenge to manage content in multi versions. It is possible to deploy content from one workspace to another by export/import database but, it may create complexity if your project is content driven and the production environment is updated continuously. For this scenario, you need some basic environment to deploy contents from live environment to your development or stage environment to make your workspace updated.

    Deploy module provide this functionality for your Drupal project.

    how to use deploy module in D8

    Required modules:
    ● Deploy ( https://www.drupal.org/project/deploy )
    ● Conflict ( https://www.drupal.org/project/conflict )
    ● Key_value ( https://www.drupal.org/project/key_value )
    ● Multiversion ( https://www.drupal.org/project/multiversion )
    ● RELAXed Web Services ( https://www.drupal.org/project/relaxed )
    ● Replicate ( https://www.drupal.org/project/replicate )
    ● Workspace ( https://www.drupal.org/project/workspace )

    If your development and production environment are on different servers, you have to install Deploy module and all dependent modules in modules directory of the project root directory and enable all dependent modules.

    For complete installation of RELAXed web service module, you need to run below command from root directory. This will install all it’s dependency.

    composer require relaxedws/replicator:dev-master
    Also, you can use Composer Manager, to make sure all dependencies are added.

    Step 1: Replicator user

    It is recommended that you make use of the “Replicator” role that has been generated to do replication. To do this you can either create a new user with that role, or add that role to an existing user. You will need to do this on both of the Drupal sites (development and live environments).
    drupal 8 site roles

    Step 2: Configuring local Relaxed settings

    On both sites, under /admin/config/relaxed/settings, configure the credentials to the replicator user.
    drupal 8 relaxed web services settings

    Step 3: Configuring Relaxed remotes

    Under /admin/config/services/relaxed, click add new remote and configure it with the remote site information.
    In full url field, you need to add path of your live site with your API root.drupal webservice demo remote

    After saving remote, you can check your site status report for remote connection from /admin/reports/status path.
    drupal 8 module php details

    Step 4: Configuring the remote Workspace

    Under /admin/structure/workspace edit the Workspace that should connect to the remote site to point to the remote site.
    drupal 8 module assign workspace

    Either go to “Structure” then “Deployment” or use the deploy link in the top right of the toolbar to get the to the deployment page.

    deploy live to live drupal 8 module

    Visit the live website and you will see all the content from the local website.

    For Pull from live site to local site you need to click on update.

    drupal 8 live changes

    .

    Please note that, the steps are for Drupal 8.3.x version. Newer versions may have different UI, but effectively having the same process.

    The Drupal team, at cmsMinds uses simple but often overlooked process which creates hassles for developers and business users. We’re a full stack web development company with Drupal in NC,USA as our choice of enterprise CMS tools. For any queries feel free to connect with us at https://cmsminds.com/contact/.

    guest
    0 Comments
    Inline Feedbacks
    View all comments
    Top