
Moving your website from Drupal 9 to 10 isn’t just a nice to have upgradation. Think of it as turbocharging your site’s presence with the latest tech under the hood.
We hear you thinking why jump to Drupal 10?
The decision to upgrade involves weighing these concerns against the benefits of improved security, new features, and better performance that come with newer versions of Drupal.
Often, the decision to upgrade depends heavily on organizational priorities, satisfaction with the current version, and fear of breaking custom functionality.
But here’s the thing. Upgrading to Drupal 10 is not just a recommendation; it’s imperative for your site’s security.
Delaying this transition could leave your website open to security breaches and lagging in performance.
Upgrading to Drupal 10 ensures your site remains secure and competitive by utilizing all the new features and benefits it has to offer.
Sounds convincing?
We have created this step-by-step guide to provide you with a technical walkthrough to ensure a smooth transition without barreling into any trouble.
First, Prepare Your Site for Drupal Upgrade
- Verify System Readiness: Check if your hosting environment supports Drupal 10 by reviewing PHP versions, necessary libraries, and other system requirements.
- Update Modules and Themes: Make sure all modules and themes from Drupal 9 are updated or have available versions compatible with Drupal 10. Check each project’s page for compatibility details or look for alternative solutions if needed.
- Review Custom Code: Examine any custom modules or themes for compatibility with Drupal 10, referring to official Drupal documentation for any API changes or deprecated functions that need attention.
- Secure Your Site with Backups: Back up all critical components of your website, including the codebase, media files, and databases, to safeguard against potential data loss during the upgrade process.
Let’s jump right into the steps.
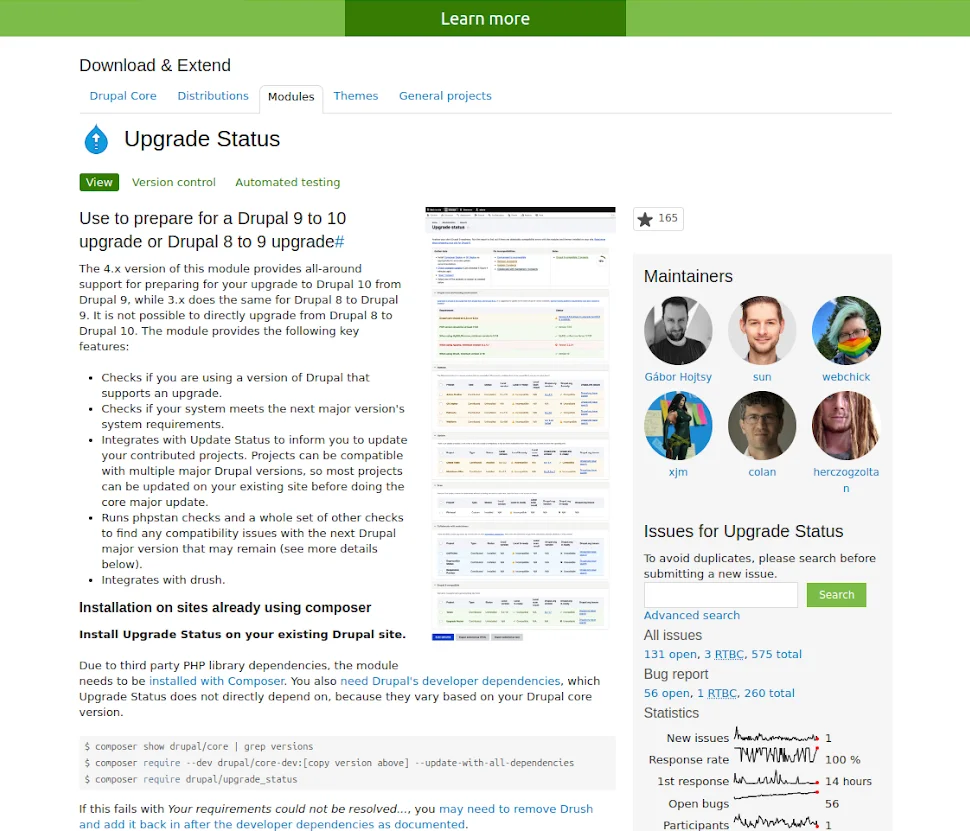
1. Install the Upgrade Status Module
Start by installing the Upgrade Status module to assess your site’s readiness for Drupal 10. Use Composer with the command according to your Drupal version.
2. Review Compatibility
Upon installation, the Upgrade Status module provides a dashboard displaying compatible and non-compatible modules/themes. Navigate through your Drupal admin to find this dashboard.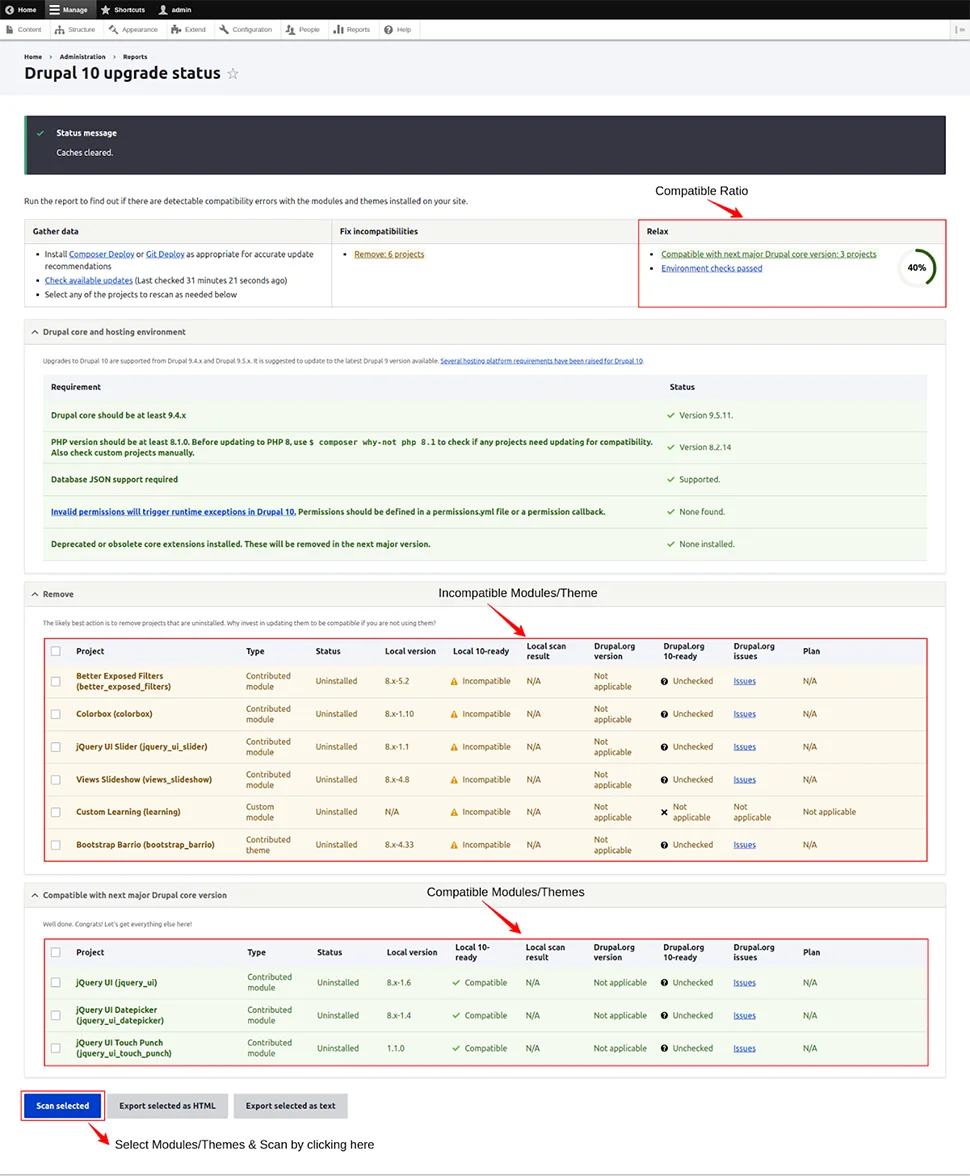
3. Scan Modules and Themes
Manually scan each module and theme by selecting them within the Upgrade Status dashboard. Post-scan, you’ll see a breakdown of compatibility.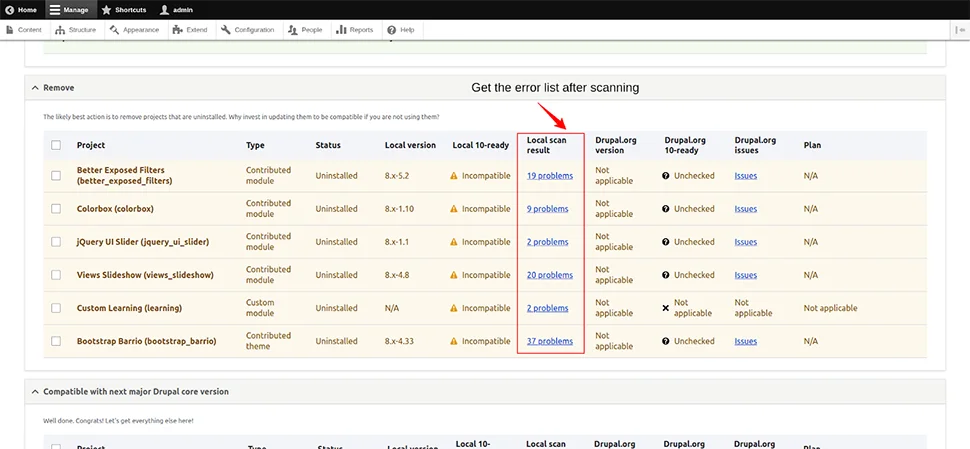
4. Update Modules and Themes
Update all contrib (community-contributed) and custom modules/themes to versions compatible with Drupal 10. For custom modules, review and manually adjust the code as necessary. Use the tool Rector for scanning and upgrading custom module code, which we’ll cover next.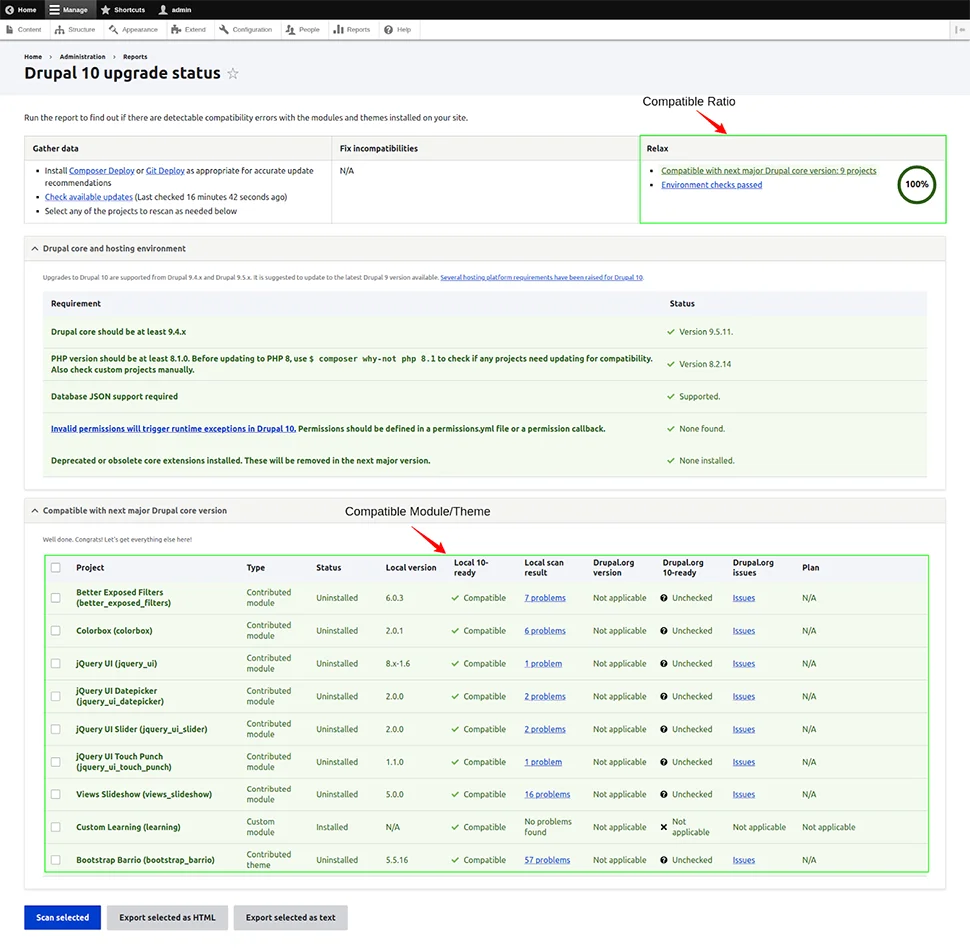
5. Run Drupal 10 Upgrade Commands
Execute the following Composer commands to initiate the Drupal 10 upgrade:
composer require drupal/core-recommended:^10.0 drupal/core-composer-scaffold:^10.0 drupal/core-project-message:^10.0 --no-update --update-with-all-dependencies
composer update --ignore-platform-req=php+
Note: The ‘–ignore-platform-req=php+’ flag is optional and helps bypass PHP version requirements if needed.
6. Drupal Rector for Custom Modules
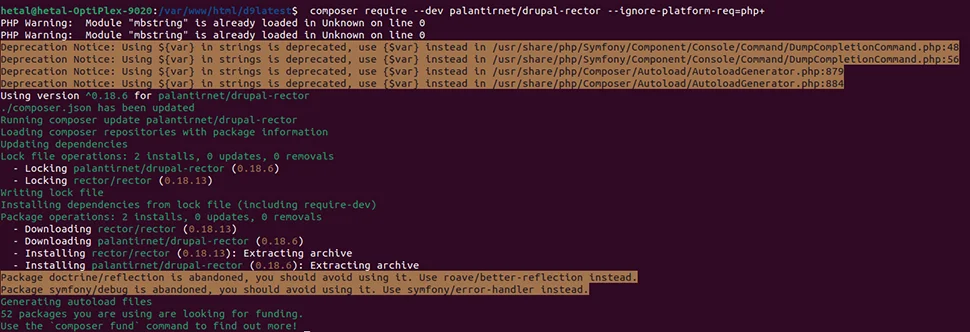
- Install Drupal Rector: Use Composer to install Drupal Rector, which aids in updating deprecated code.
Composer require –dev palantirnet/drupal-rector
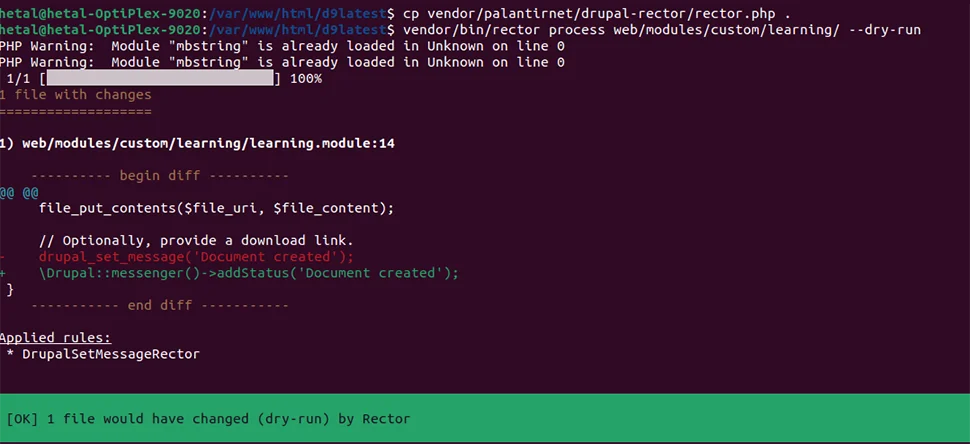
- Prepare Rector: Copy the rector configuration file to your project’s root directory.
vendor/palantirnet/drupal-rector/rector.php
- Scan Custom Module Code: Check for deprecated code in custom modules using:
vendor/bin/rector process web/modules/custom/[CUSTOM_MODULE_NAME]/ –dry-run
- Upgrade Code: Finally, execute Rector to upgrade the deprecated code automatically.
vendor/bin/rector process web/modules/custom/[CUSTOM_MODULE_NAME]/
7. Manual Review and Update
To update the database:
- Execute drush updatedb to apply any remaining database updates.
- Review .htaccess and robots.txt Files:
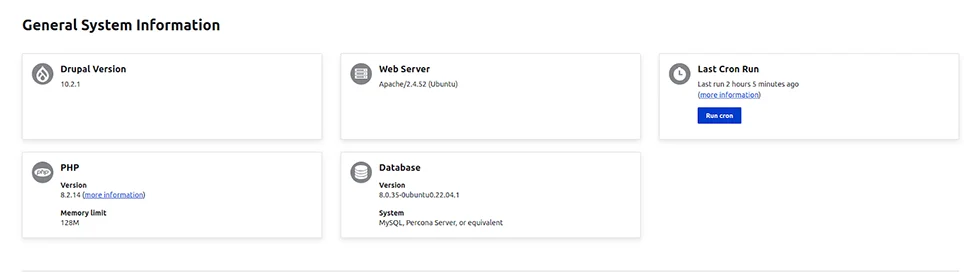
- Compare these files with their originals to ensure no necessary customizations were overwritten. Then you can check the Drupal version status in the Status Report.
How to Troubleshoot with Rector
Post-upgrade, it’s crucial to address any compatibility issues that arise. If encountering errors post-upgrade, use Rector to identify and resolve compatibility issues in custom modules:
Step 1: Instal Rector:
composer require --dev palantirnet/drupal-rector
Step 2: Copy Rector Config:
cp vendor/palantirnet/drupal-rector/rector.php .
Step 3: Analyze and Apply Fixes: Perform a dry run to preview changes.
vendor/bin/rector process web/modules/custom/YOUR_MODULE_NAME --dry-run
Apply the changes:
vendor/bin/rector process web/modules/custom/YOUR_MODULE_NAME
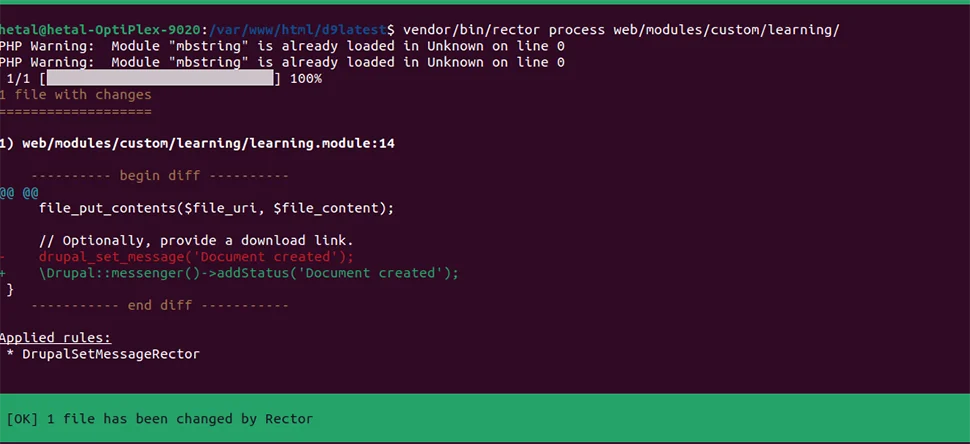
Rector efficiently strips away outdated code and replaces it with updated, functional code. We advise you to manually review the file afterward for verification.
Note: Rector operates on a unique algorithm, enabling it to automatically refresh code recognized within its system.
However, for any code not covered by its algorithm, Rector will only identify the obsolete segments, necessitating manual updates on our part.
Following these steps will streamline your transition to Drupal 10, ensuring your site benefits from the latest advancements in Drupal’s CMS technology.
Remember, upgrading a complex site might involve nuances not covered here, so partnering with a seasoned developer makes your job stress-free. cmsMinds is a Drupal development company focused on creating scalable websites.
From migration to multisite integration, we offer a comprehensive range of Drupal development services to help you harness the full potential of this robust content management system.